This put up was completed in partnership with Macy’s, who sponsored this get collectively by providing the compensation and pleasant wares from their Martha Stewart Collectors Enameled Solid Iron Assortment and Martha Stewart Harvest Assortment to make it happen. As on a regular basis, all concepts and opinions are my very personal, and thanks for supporting Hummingbird Extreme and my superior sponsors!
Can I share somewhat bit secret?
No matter shifting once more to Portland and having an infinite (correctly, not that huge, nevertheless it undoubtedly feels huge after dwelling in San Francisco and New York), pretty house to fill with household and associates, the thought-about having of us over stresses me out.
It’s all in my head, I admit it. The house is earlier — in-built 1912, I’m slowly updating it room by room. The kitchen is good, nevertheless as soon as I stroll into the alternative rooms, all I see are the cracks and peeling paint on the partitions, the dents and scratches on the flooring that must be mounted. I’m paranoid that my guests will select me on these flaws (despite the fact that all they’ve ever completed is inform me how pretty all of it’s, on account of my friends are improbable).


One different half is that cooking for an infinite crowd stresses me out. The ultimate huge feast I had in my house was in 2014; I was dwelling with three dudes, all of whom have been huge eaters. We decided to host an Asian-style Friendsgiving with all of our friends, and I’d foolishly taken on higher than I could cope with. And picture me, there’s nothing additional worrying than making an attempt to make six or seven dishes immediately with a room filled with hangry boys yelling about how hungry they’re. Ahh, Thanksgiving.
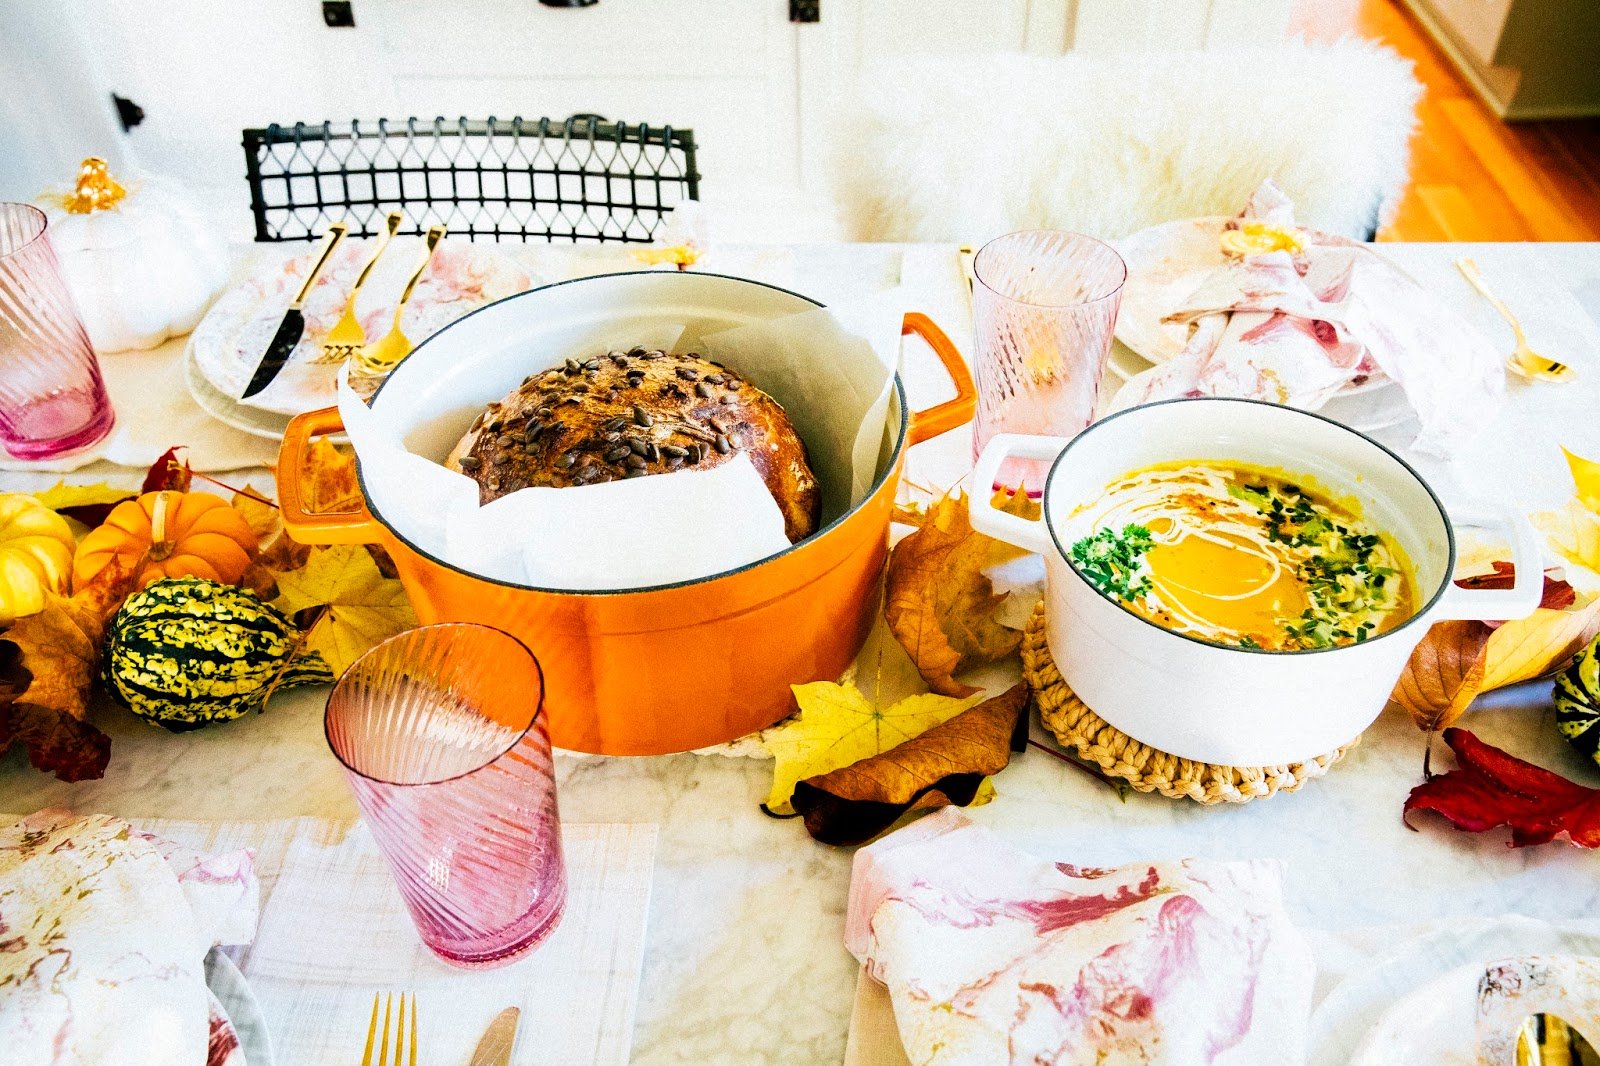
It appears that evidently the trick to actually have gratifying as a bunch and deal with is to, correctly, keep it small. And keep it simple. Significantly within the occasion you’re new to your entire feast/entertaining issue. Invite a handful of friends—maybe merely two or three—and easily serve a handful of dishes that come collectively merely with little to no work. Soup is an effective occasion; it’s hearty, tasty, and comforting all through the chilly fall/winter season. The prep is simple — roast the greens sooner than mixing them, and serving them with handfuls of sensible, pretty herbs.
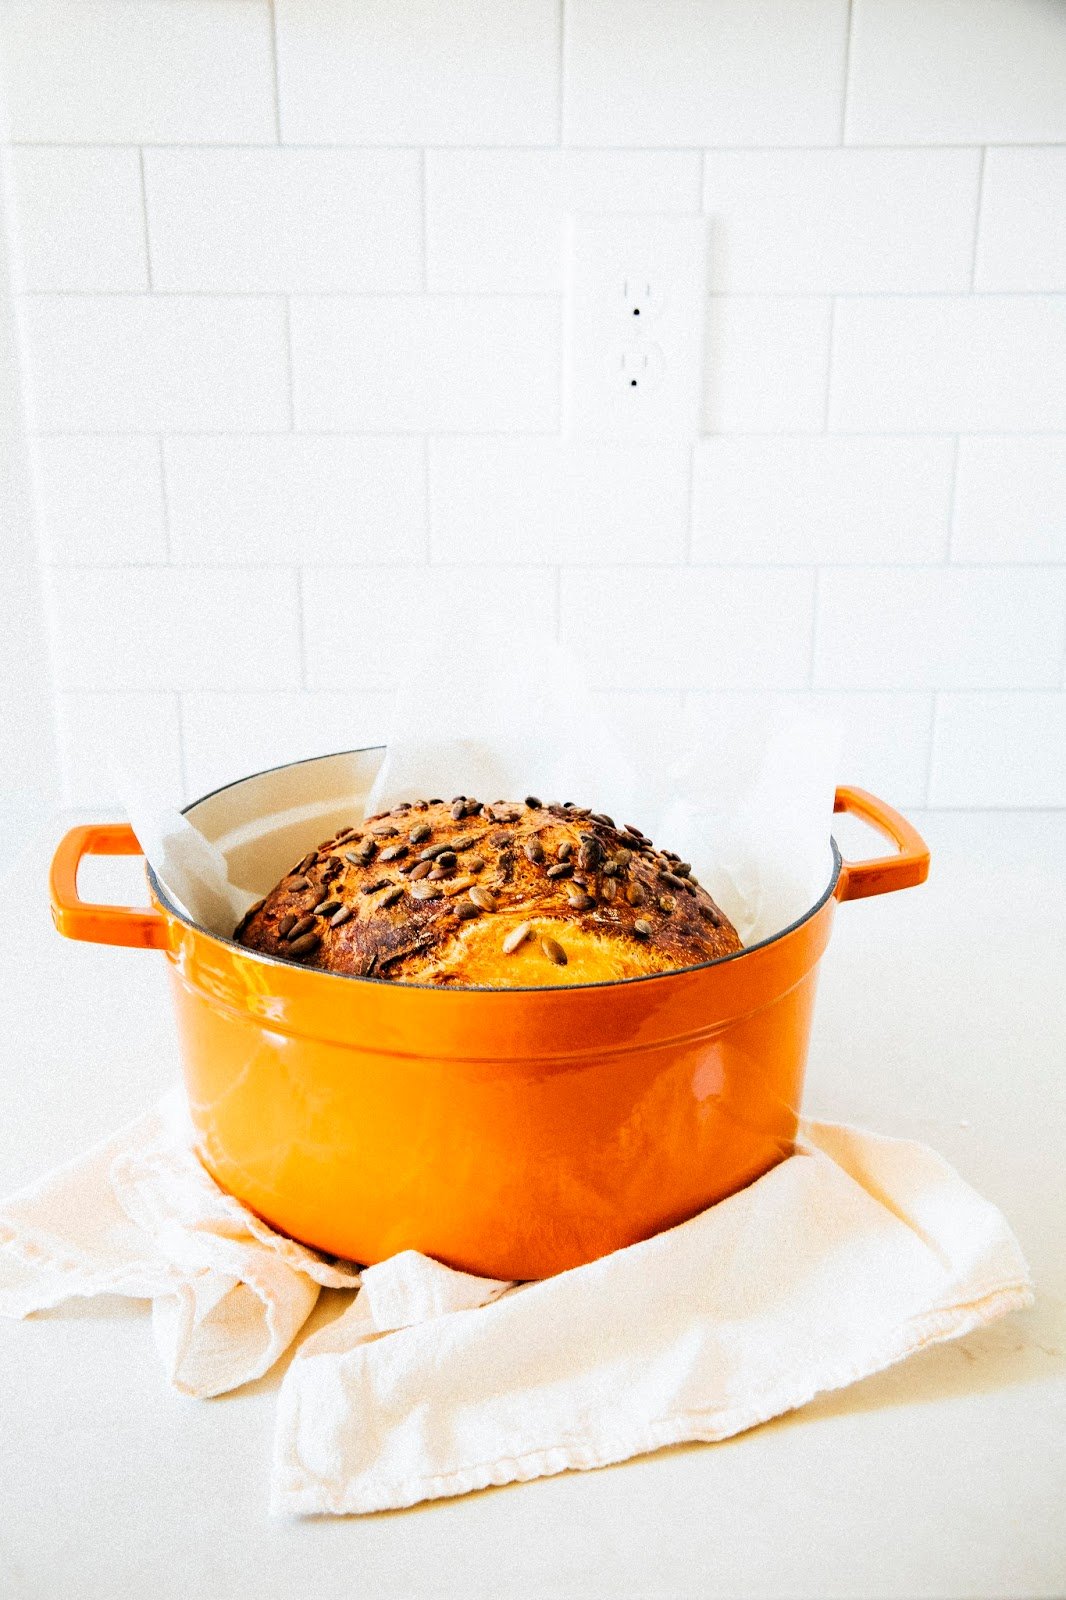
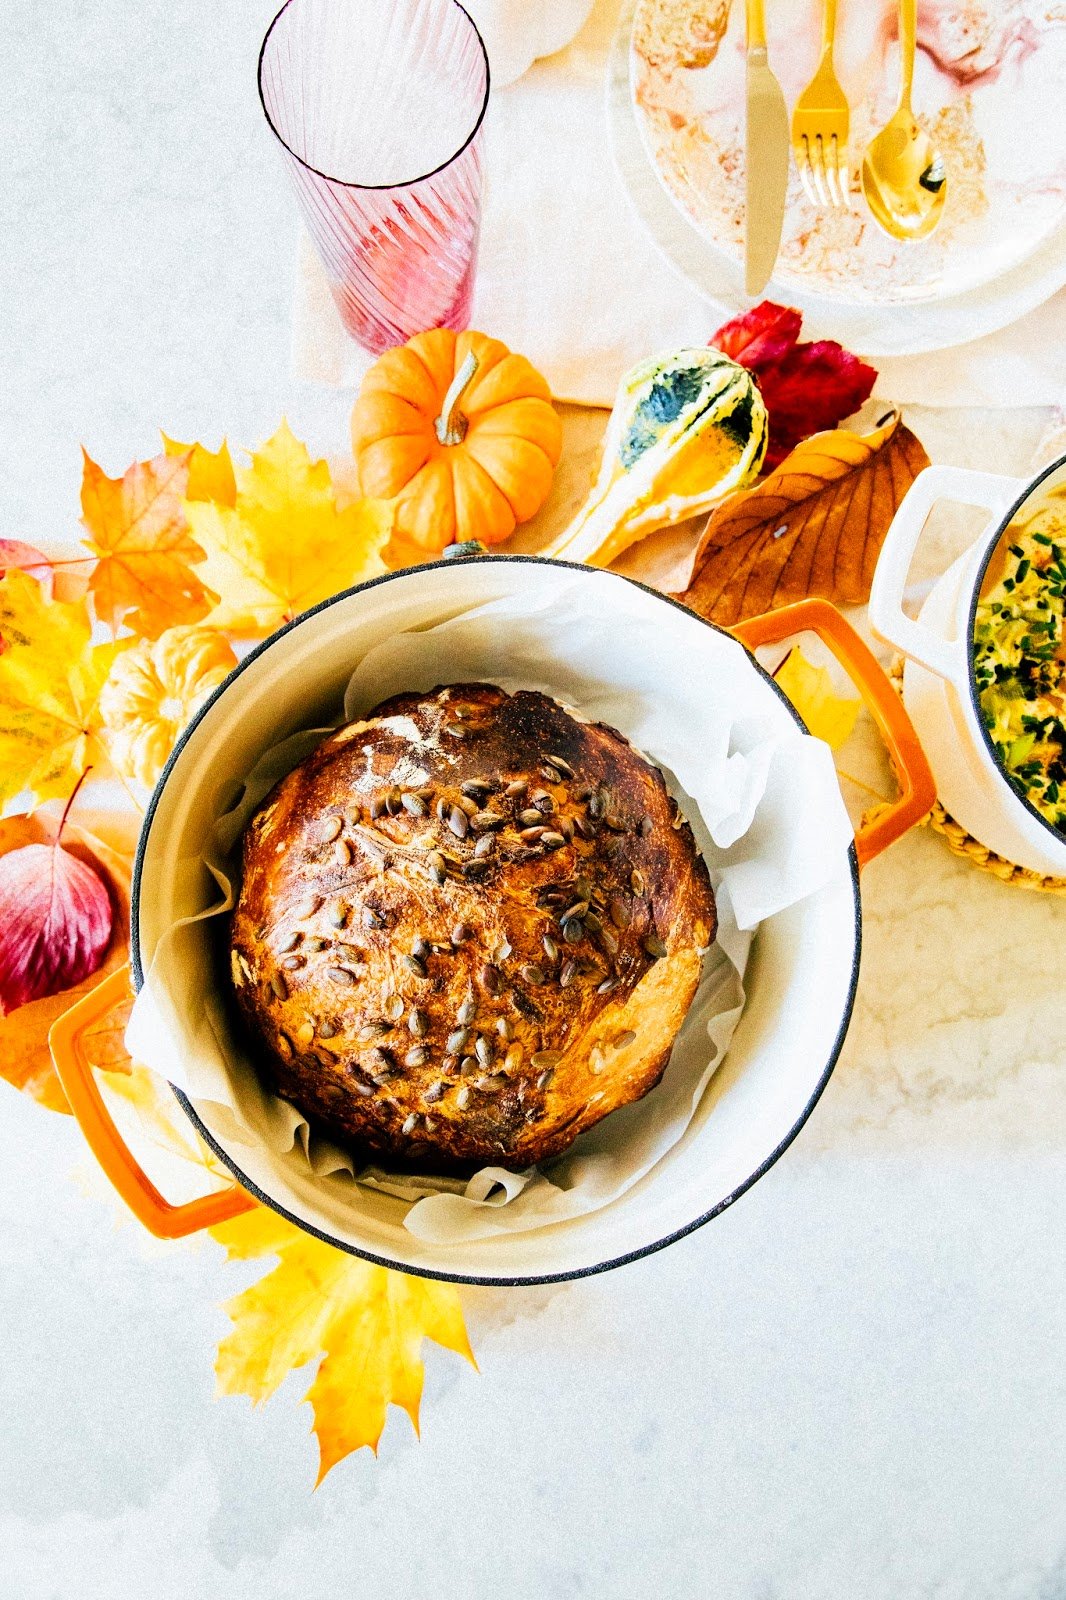
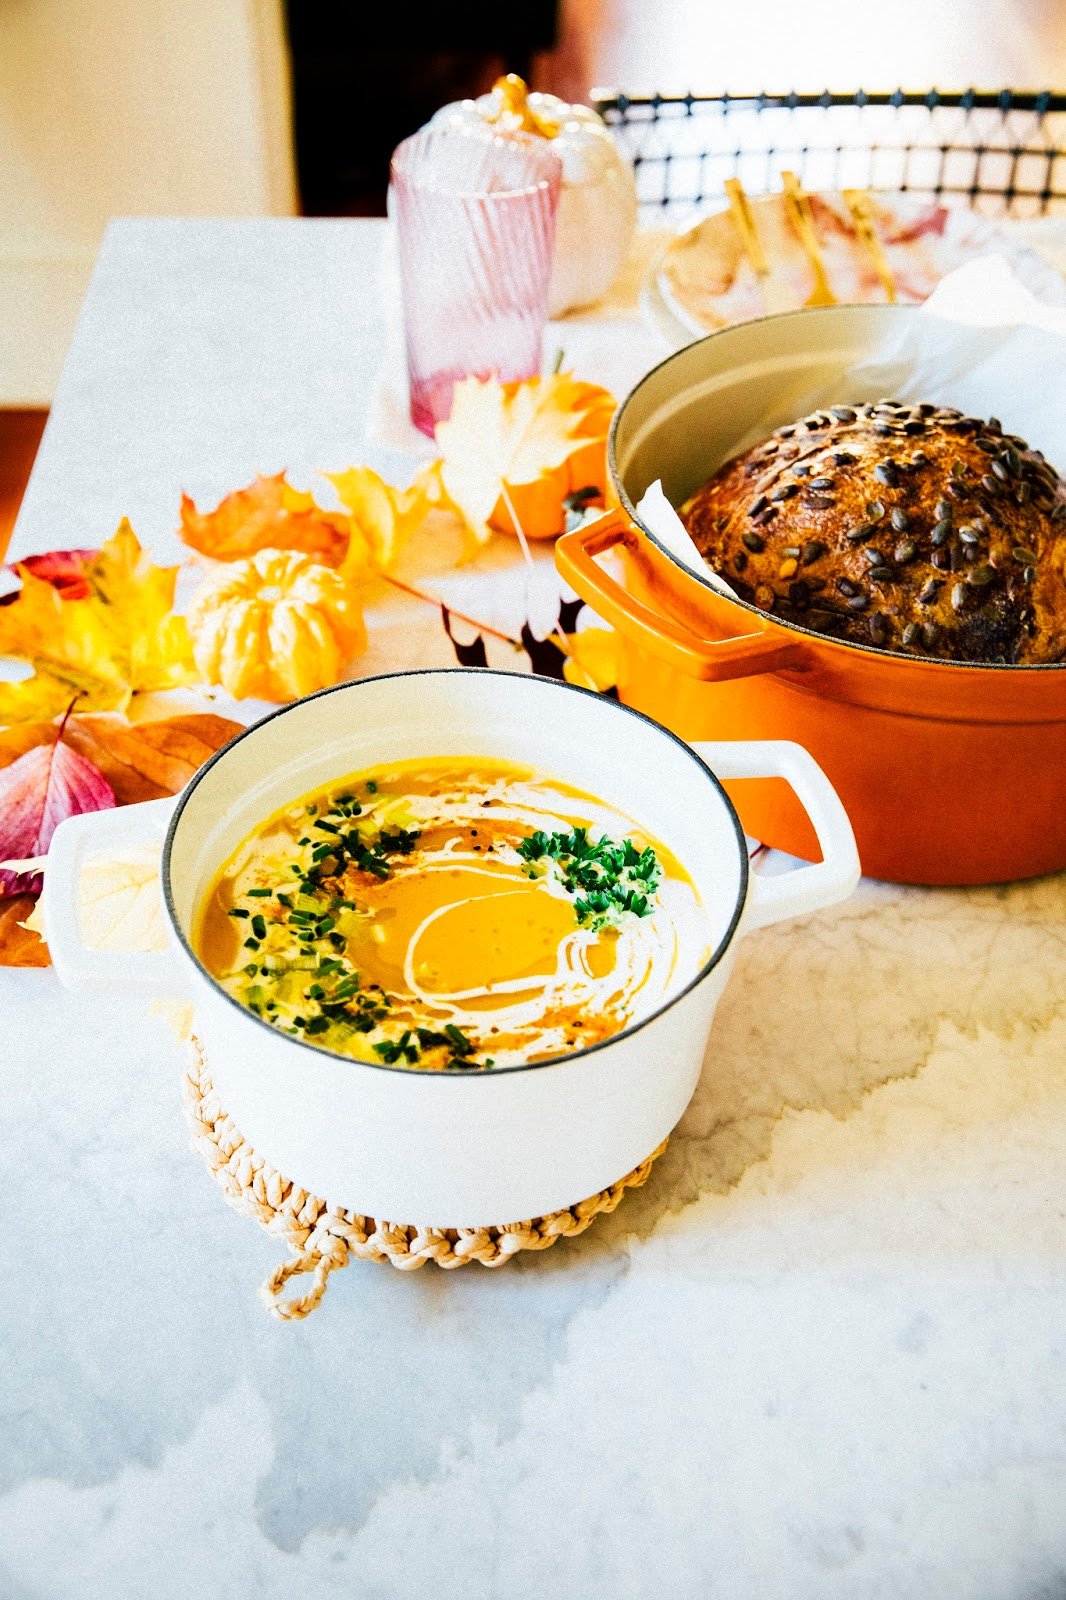
And naturally, no good soup dish is full with out bread. I want to make my very personal bread at dwelling to basically impress all folks. People are usually intimidated by bread; I do know I was, for a really very long time. Nevertheless you’ll actually put collectively a ravishing loaf with out an extreme quantity of labor. After stirring and kneading the substances collectively a lot of events, all you actually wish to do is wait. After that, the important thing lies in baking it inside a heavy, lidded enameled cast-iron pot like this one from Macy’s Martha Stewart assortment. The pots conduct heat evenly and successfully, and the lid retains steam in to make the fantastically brown and secure crust that is the sign of , hearty bread.
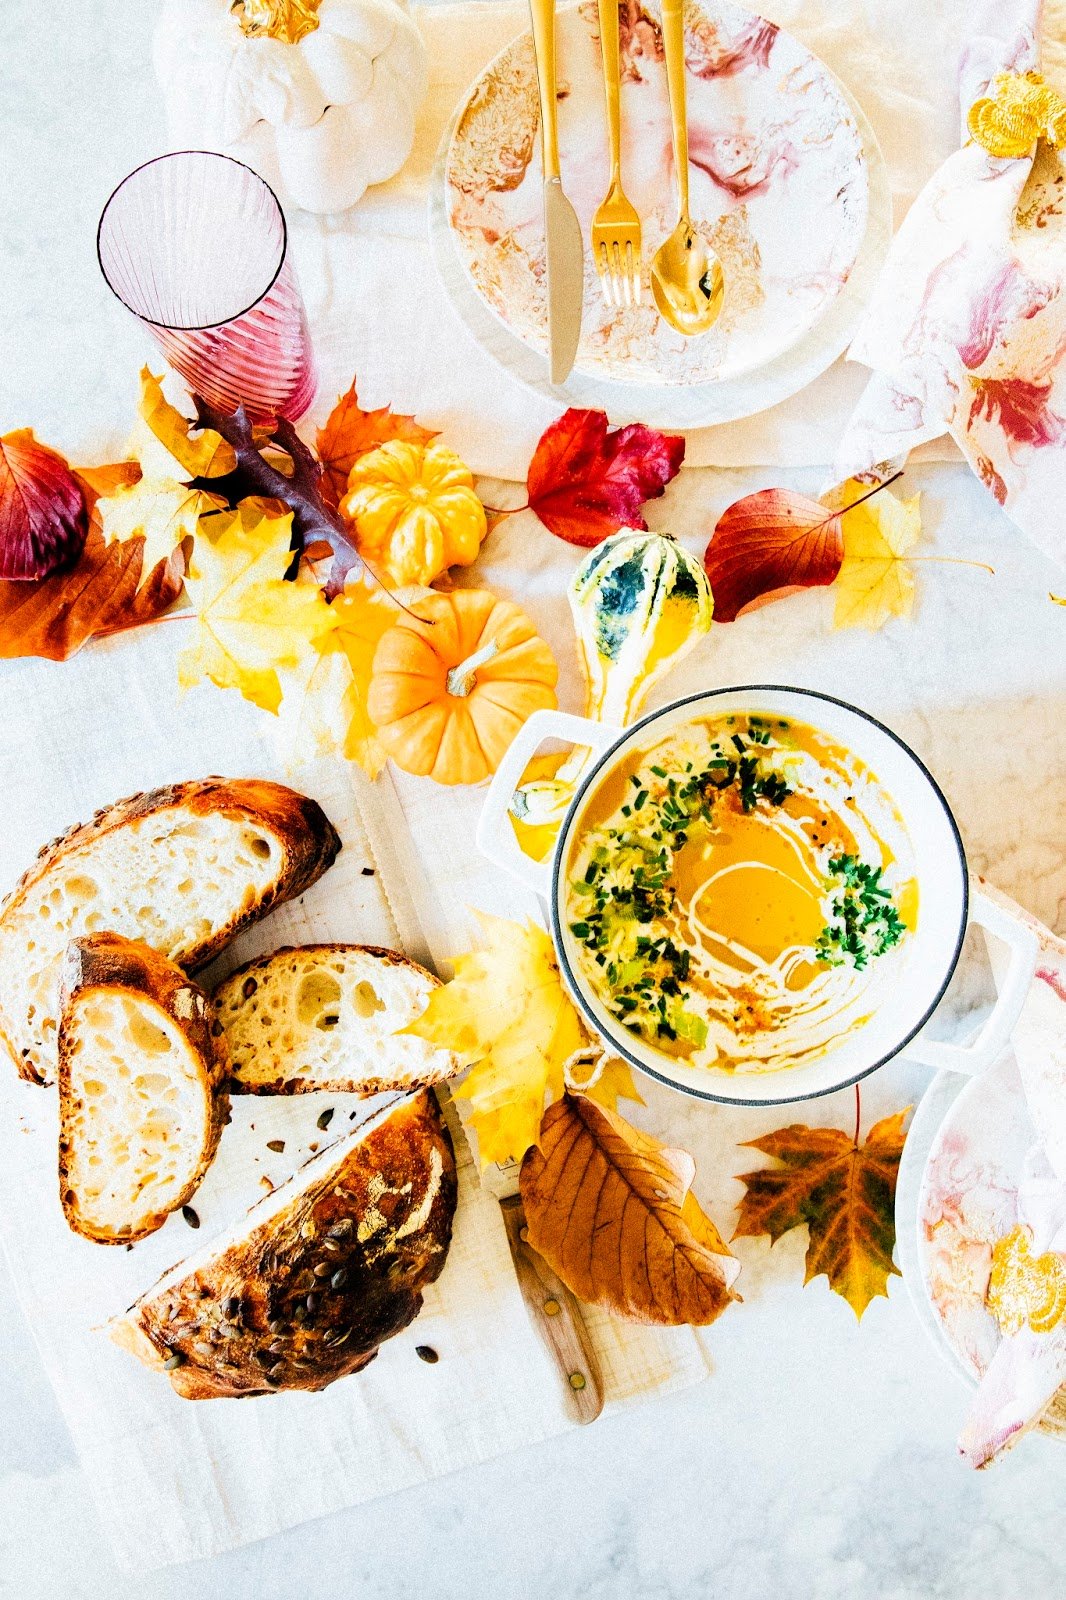
So with out extra ado, proper right here is a simple, breezy autumn feast menu for 4 full along with your particular person rustic, artisan bread. Benefit from!
Featured:
Some maker’s notes:
- Plan ahead for this one! At any time after I throw occasions, I prefer to interrupt up the work so that I’m not actually doing an entire lot on the day of the get collectively. For this menu, which means mixing the bread and roasting the pumpkin the evening time sooner than the get collectively. The bread will slowly proof in a single day, giving it a shocking, yeasty style and a fluffy, holey texture that everybody is aware of and love from the proper bread. Must you’re throwing the get collectively on Saturday evening time, schedule is to mix the bread at 7PM on Friday evening time, and type the bread for its second proofing between 8AM to 10AM the next morning. The bread might be ready sooner than lunch. As for the soup, you’ll probably make it about an hour or two sooner than your guests arrive — the longest part of the recipe is prepping and roasting the pumpkin, which you’ll be able to do each the evening time sooner than or inside the morning of your evening feast.
- There are a couple of quirks inside the recipe for the nation pumpkin seed bread. Must you want to bake using amount measurements like I do, you’ll need a 1/8-cup measure. However, bread baking could possibly be very actual, so I prefer to advocate using a digital kitchen scale for this recipe. The recipe will even look like it doesn’t have enough yeast in it, nevertheless think about me as soon as I say that you just don’t need any additional. A smaller amount of yeast extends fermentation time, which causes the dough to be additional acidic and offers additional superior flavors and aromas to the bread. Make sure you employ on the spot dried yeast (versus energetic dry yeast); you’ll wish to alter the temperature of the water within the occasion you go for each different kind of yeast.
A Cozy Autumn Dinner Get collectively Menu
—
In a single day Rustic Pumpkin Seed Bread
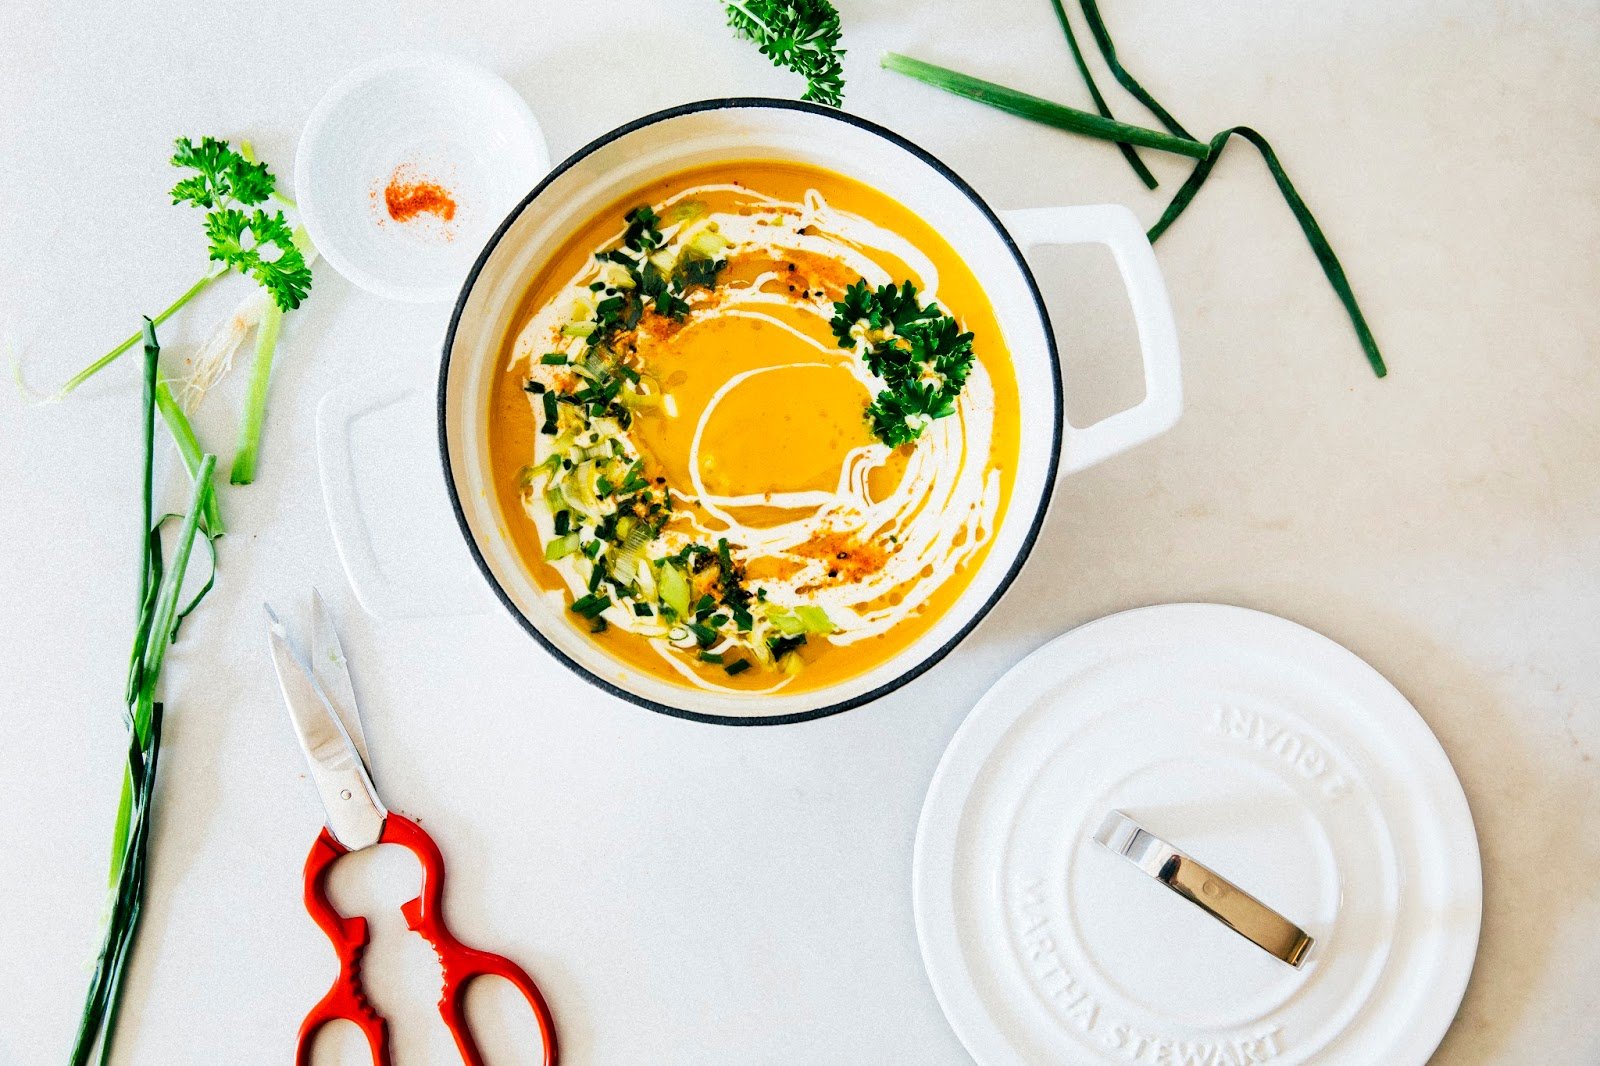
Pumpkin Coconut Soup
—
—
In a single day Rustic Pumpkin Seed Bread
(tailor-made from Flour, Water, Salt, Yeast)
Substances:
(makes a 10-inch boule)
- 3 7/8 cups (17.65 ounces) bread flour, plus additional for work surfaces
- 1 2/3 cups (13 fluid ounces) water, warmed to between 90 (F) and 95 (F)
- 1 1/2 teaspoons kosher salt
- 1/8 teaspoon on the spot dried yeast
- 1/3 cup (1.85 ounces) raw pumpkin seeds
The Night Sooner than
-
- Combine 3 7/8 cups bread flour, 1 2/3 cups warmth water (see baker’s notes) inside the bowl of a freestanding electrical mixer. Use a rubber spatula or a wooden spoon to mix until merely built-in. Cowl with plastic wrap and let rest for 20 to half-hour.
-
- Sprinkle 1 1/2 teaspoons kosher salt and 1/8 teaspoon on the spot dried yeast evenly extreme of the dough. Run a rubber spatula or a wooden spoon under the sink and mix the salt and yeast into the dough, rewetting your instrument as wished to cease the dough from sticking. Attain beneath the dough and seize a couple of quarter of it. Gently stretch this a part of dough and fold it extreme to the alternative side of the dough. Repeat three additional events, until the salt and yeast are completely enclosed.
-
- Nestle a dough hook attachment to your freestanding electrical mixer. Beat on low velocity for about 3 minutes, or until the dough has stress in it. Don’t concern in case your dough seems sticky — it’s a fairly moist dough. Let the dough rest for a few minutes, then beat as soon as extra on low velocity for an extra 30 seconds or so until the dough tightens up. Use a digital, instant-read meals thermometer to measure the temperature of the dough; the aim temperature on the end of this course of is between 77 (F) and 78 (F). Don’t concern if it’s a lot of ranges cooler than that; that merely means your dough will take longer to rise. Cowl the bowl with plastic wrap and let the dough rise for about half-hour.
-
- After half-hour, you’ll must “fold” the dough. Run your hand under the sink (moist arms help cease the dough from sticking to you) and attain under the mound of dough, grabbing about one quarter of it. Stretch this a part of the dough to the aim of resistance (don’t drive it!), then fold it over your whole measurement of the dough mass to the opposite side of the dough. Repeat about 4 or 5 events, working throughout the dough until it has tightened proper right into a ball. Seize your whole ball and invert it so that the seam side the place all the folds have come collectively, faces down. This helps the folds keep their place — the best must be simple.
- When the dough relaxes a bit and flattens all through the underside of the bowl, repeat the tactic for a second fold. Counting on the temperature of your dough and the temperature of the room, this may take wherever between 10 to half-hour. Repeat the folding course of described in Step 4. Let the dough relax/flatten for an additional time, sooner than repeating the folding course of 1 last time. Cowl the bowl with plastic wrap and let it rise in a single day on the counter at room temperature. When the dough is about 2 1/2 to a few events its genuine amount, it is ready to be divided. It should take spherical 12 to 14 hours to get to this state.
The Day of Baking
-
- As quickly because the dough has risen in amount in a single day, it’s time to fold and type the loaf. Mud a chunk flooring and your arms with flour. Line a medium bowl with parchment paper and excessive with a dusting of flour.
-
- Tip the bowl containing the dough barely and use your arms to softly loosen the dough from the underside of the bowl with out pulling or tearing it. Type the dough proper right into a medium tight ball by folding reminiscent of you probably did the evening time sooner than, nevertheless with floured arms as an alternative of moist ones: attain under the mound of dough, grabbing a couple of quarter of it and stretching it to the aim of resistance. Fold it over the scale of the dough mass to the opposite side of the dough. Repeat about 4 or 5 events, working throughout the dough until it has tightened proper right into a ball. Seize your whole ball and invert it so that the seam side faces down. Swap to the lined medium bowl and frivolously flour the best of the loaf sooner than defending the bowl in plastic wrap. That’s the final rising interval sooner than baking, usually often known as “proofing.”
-
- Plan on baking the loaf about 1 hour and quarter-hour after it’s been fashioned, assuming a room temperature of about 70 (F). In case your kitchen is hotter, the loaf might be ready in about 1 hour. You’ll be able to inform when the loaf is ready via using the Finger-Dent Check out: poke the risen loaf with a floured finger, making an indentation about 1/2-inch deep. If it springs once more immediately, the loaf desires additional time to proof. If the dent doesn’t spring once more the least bit, the loaf is overproofed. You probably can nonetheless bake it, nevertheless the loaf maybe on the dense/heavy side.
-
- You’ll moreover must preheat your baking pot and oven as a result of the loaf is proofing a minimum of 45 minutes earlier to baking. Center a rack inside the oven and place a 6 qt. spherical casserole pot with a lid on the rack. Preheat the oven to 475 (F).
-
- As quickly because the oven and casserole pot have every been preheated and the loaf passes the Finger-Dent Check out, it’s time to bake your bread. Invert the proofed dough onto the center of the parchment paper, so that the seam side of the dough might be up. Put collectively a parchment paper sheet by spraying it with cooking spray and sprinkling it generously with flour. Fill a fine-mist spray bottle with water and spritz the dough with water until it is glistening moist, nevertheless not dripping. Sprinkle 1/3 cup pumpkin seeds over the dough — the water will help the seeds stick.
-
- Use oven mitts to fastidiously take away the preheated casserole pot from the oven, eradicating the lid. Use the parchment paper to fastidiously change the proofed dough, seam-side/seeded-side up with the parchment paper on the bottom into the pot. Be additional cautious, the pot will get HOT! Use oven mitts to fastidiously change the lid.
-
- Swap to the preheated oven and bake for half-hour, sooner than fastidiously eradicating the lid and baking for an additional 20 to half-hour until the bread is a minimum of medium darkish brown all through the loaf. Take a look at the oven after quarter-hour of baking uncovered in case your oven runs scorching.
- As quickly because the bread is ready, it can possible be a uniform darkish brown all via. Use oven mitts to remove the casserole pot from the oven and totally use the parchment paper to hold the bread from the pot. If the parchment paper disintegrates, you’ll fastidiously tip the pot so that the bread tumbles out. Place the loaf on a wire rack and let it rest for at least half-hour sooner than slicing — don’t slice any sooner! The bread stays to be cooking inside, and it’s vital that you just let any residual inside heat and steam do its work loaf will sound gap when tapped on the crust. Protect uncovered, at room temperature, until in a position to serve.
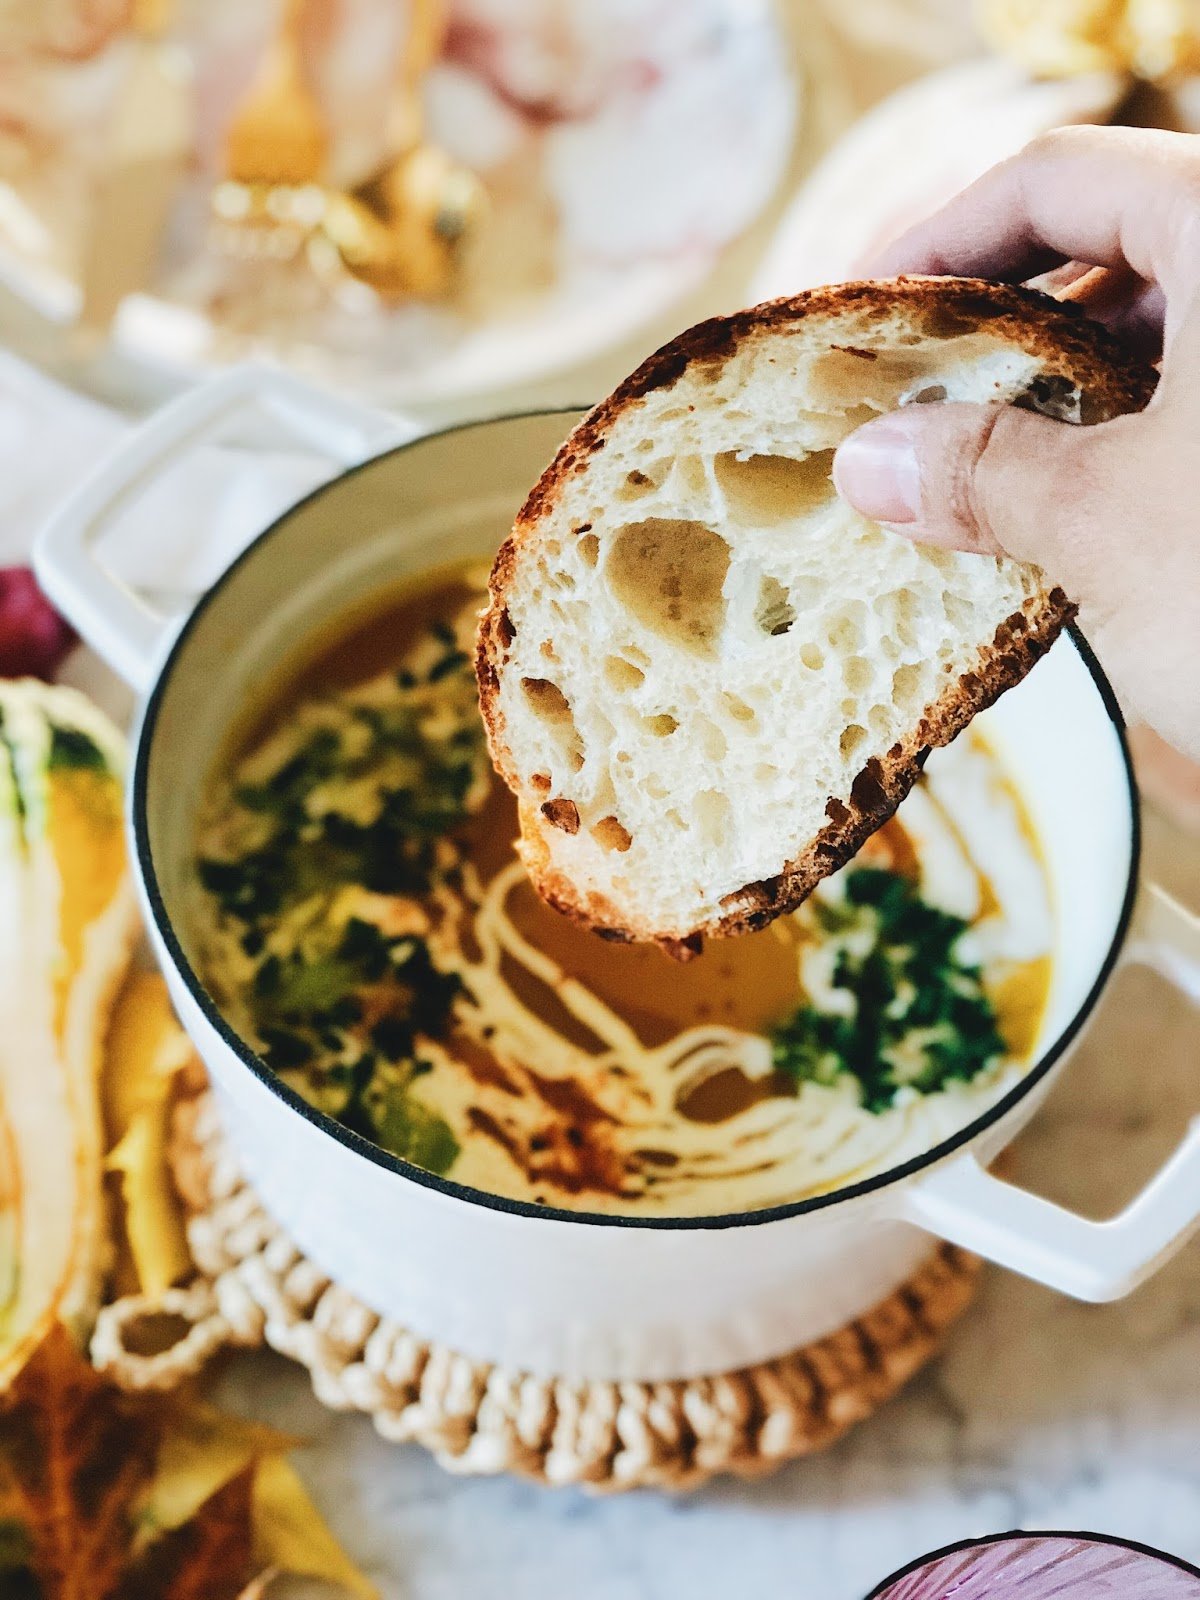
Pumpkin Coconut Soup
Explicit Instruments:
Substances:
- a small (spherical 4 kilos) pumpkin
- 4 tablespoons grapeseed oil, divided into 1 tablespoon and three tablespoon elements
- 1 large yellow onion, diced
- 4 large garlic cloves, minced
- 2 teaspoons kosher salt
- 1 teaspoon yellow curry powder
- 4 cups (32 fluid ounces) vegetable broth
- 1/2 cup (4 ounces) full fat unsweetened coconut milk
- 2 tablespoons bitter cream
- 2 teaspoons extra-virgin olive oil
- scallions, for serving
- chives, for serving
- a pinch of cayenne pepper
- freshly flooring black pepper
Recipe:
The Night Sooner than
-
- Preheat the oven to 425 (F) and put collectively a baking sheet by lining with aluminum foil and spraying with a thin layer of cooking spray. Put apart.
-
- Rigorously halve a small pumpkin and scooping out and discarding the seeds. Slice the pumpkin in half to make quarters. Brush 1 tablespoon grapeseed oil over the flesh of the pumpkin and place the quarters, flesh side down, onto the baking sheet. Roast for 35 minutes or until the orange flesh is unquestionably pierced by way of with a fork. Put apart on a wire rack to sit back for a few minutes.
- As quickly because the pumpkin is cool enough to the contact, gently peel the pores and pores and skin off. It ought to return off fairly merely. Discard the pores and pores and skin and change the pumpkin to a tupperware with a lid. Swap to the fridge and funky in a single day.
The Day of Cooking
-
- Place a 2 qt. casserole pot on medium heat. When the pot is warmth, add 3 tablespoons grapeseed oil. As quickly because the oil is shimmering, add 1 large diced yellow onion, 4 large minced garlic cloves, 2 teaspoons kosher salt, and 1 teaspoon yellow curry powder. Stir to combine. Cook dinner dinner, stirring generally, until onion is translucent, about 8 to 10 minutes.
-
- Reduce the heat to medium-low and add the roasted pumpkin from the evening time sooner than and 4 cups vegetable broth. Use an immersion blender to interrupt up the pumpkin and onions to create a homogenous, yellow-orange mixture. Convey the mix to a boil, then cut back heat and simmer for about quarter-hour, giving the flavors time to meld.
-
- After about quarter-hour, cut back the heat once more all the best way all the way down to medium-low and stir in 1/2 cup coconut milk. Take away the soup from heat and let it cool barely, sooner than using the immersion blender as soon as extra to combine the soup to remove any lumps and chunks.
- Swap 2 tablespoons bitter cream to a small Ziploc bag. Decrease a tiny hole inside the nook of the bag to create a mini piping bag on the fly; squeeze the bitter cream by way of the opening on excessive of the soup to make patterns inside the soup. Drizzle with 2 teaspoons olive oil. Garnish with scallions and chives, and season with black pepper and cayenne pepper to model.
—
—